


A linked list is a fundamental data structure in computer science and one worth knowing since it often serves as the basis for more complex data structures and algorithms. This post will focus on the mechanics of my approach to implementing a singly linked list using classes in JavaScript.
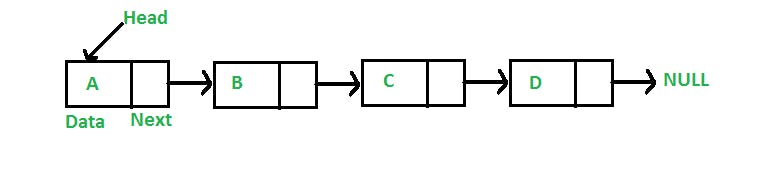
A linked list is a linear structure that contains items, or nodes, which are linked to each other. The simplest kind is a singly linked list where each node in the list contains a data property that contains some kind of value, and a next property that contains a pointer to the next node. This variant of a linked list only allows for traversal of items in one direction and is often used to represent sequences or push-down ("LIFO") stacks.
If you're a new programmer like myself, you're probably thinking a linked-list sounds an awful lot like a simple array, but there are critical differences which can have major implications on the design of a program. Some of the differences are as follows:
Advantages over arrays:
- dynamic size
- ease of insertion and deletion
Disadvantages:
- random access is not possible.
- extra memory is required for the next property of each node
For a deep dive on the tradeoffs, I recommend this excellent post from GeeksforGeeks.
Now to the code. This program will implement two classes: SimpleLinkedList and Element.
class SimpleLinkedList {
  constructor() {
    this.headNode = null;
    this.length = 0;
  }
}

class Element {
  constructor(data, nextNode = null) {
    this.data = data;
    this.nextNode = nextNode;
  }
}
The SimpleListList class is straightforward. When its constructor argument is invoked, it returns a new object with two properties. The headNode property will contain a pointer to the first node, or head, in the linked list. The length property is not fundamental to the structure but rather provides an easy way to track the size of the list.
The Element class will serve as the basis for each node in a given list. Its constructor accepts two arguments: the value be to be assigned to the data property of the new node and a pointer to the next node, which by default is set to null, which indicates the end of the list.
These classes aren't terribly useful at this point though. Let's first add some methods to the Element class and equip it with some useful interfaces:
class Element {
  constructor(data, nextNode = null) {
    this.data = data;
    this.nextNode = nextNode;
  }

  datum() {
    return this.data;
  }

  isTail() {
    return this.nextNode === null;
  }

  next() {
    return this.nextNode;
  }
}
Each of these methods are instance methods to be used with, you guessed it, instances of the Element class. datum returns the value referenced by the data property of a given node, isTail helps us determine if a node is the last item in the list and next allows us to traverse the list.
How do we know what to assign to a new instance's nextNode property though? That's where the SimpleLinkedList class comes in. Let's add a push method that will create a new node in an existing list:
// SimpleLinkedList class

push(data) {
    const newNode = new Element(data, this.head());
    this.headNode = newNode;
    this.length += 1;
  }
The push method does the work of creating a new node for us. It accepts one argument, data which is handed off to the Element constructor, which has this.head() pre-populated as the argument for nextNode. In other words, push creates new node for us and assigns the current head to the new node's nextNode pointer. push then reassigns headNode to the newly created node and increments the list's length property by one.
Before moving on, let's revisit the concept of a push down stack quickly. A push down stack follows the rules of last-in-first-out aka "LIFO". To use an analogy, LIFO is like a stack of books in that you add and remove from the top of the stack rather than the bottom. In the context of a linked list, the top of the stack is the head node.
Now that we're all clear on LIFO, let's implement a method to remove a node from the list, pop:
// SimpleLinkedList class

pop() {
    let poppedValue = this.headNode.datum();
    this.headNode = this.headNode.next();
    this.length -= 1;
    return poppedValue;
First, we note the value assigned to the data property of the existing headNode. We do this so that we can return this value after the old headNode is banished to the ether, metaphorically speaking. The next line of the method reassigns headNode to the next node in line, effectively breaking off the old headNode from the list. Finally, the length property is decremented and we return the old data property as an FYI.
At this point, we can create a linked list and add or remove nodes, one at a time. What if we have an existing array full of data and we want to convert it to a linked list? Let's create a static method to do so:
// SimpleLinkedList class

static fromArray(array) {
    let newLinkedList = new SimpleLinkedList();

    if (!array || array.length === 0) return newLinkedList;

    for (let index = array.length - 1; index >= 0 ; index -= 1) {
      newLinkedList.push(array[index]);
    }
    return newLinkedList;
  }
fromArray first creates a new list instance and then iterates over each element in the array argument, starting with the last element. For each iteration for the for loop, the push method is called, effectively taking the array element, converting it to a node and adding it to the list.
Now suppose we have an existing linked list and we need to convert it to an array. We can do that too!
// SimpleLinkedList class

toArray() {
    let newArray = [];
    let currentNode = this.head();

    for (let index = 1; index <= this.length; index += 1) {
      newArray.push(currentNode.datum());
      currentNode = currentNode.next();
    }

    return newArray;
  }
The interesting feature of this method is the use of currentNode as a pointer to the current iteration of the linked list. Recall that linked-lists are not indexed and therefore we do not have random access to a node buried in the list. Instead, we have to rely on the pointer to do that work for us.
Finally, let's create a method that will reverse our linked list:
// SimpleLinkedList class

reverse() {
    let reversedList = new SimpleLinkedList();
    let currentNode = this.head();

    for (let index = 1; index <= this.size(); index += 1) {
      reversedList.push(currentNode.datum());
      currentNode = currentNode.next();
    }

    return reversedList;
  }
First, the method creates a brand new, empty list and uses the variable currentNode as a pointer, first set to the head node of the original list. Next, the method defines a for loop that will iterate through each node of the original list. On each iteration, we push the node referenced by currentNode to the new list and then reassign currentNode to the next node in the original list. In this way, the head node of the original list is pushed down all the way to the bottom of the new list. When the loop is complete, the last node of the original list is the head node of the reversed list. Finally, the method returns the new, reversed list.
Thanks for reading! I hope this post has given you a good intro to one of the most fundamental data-structures out there. The full code for these two classes can be found here .